How to Use Litematica in Minecraft: Import Builds and Fix the Errors That Stop Everyone



Recreating a build from screenshots is a special kind of misery. Four evenings for a mid-sized Japanese castle is a realistic estimate, and about half of that goes on counting roof tiles in a 900-pixel-wide image and getting it wrong anyway.
Litematica turns that into one evening. It reads a schematic file and projects the build into your world as a translucent ghost. You walk through it, fly around it, then place the blocks yourself, seeing exactly where each stair and trapdoor goes. Nothing gets placed for you, so it’s fine in survival. You still mine everything. You just stop guessing.
The setup is where people give up. So here’s the short version first, then the parts that need explaining.
Quick start: Litematica in 10 minutes
- Install Fabric Loader for your exact Minecraft version.
- Put Litematica and MaLiLib (same version, both required) in .minecraft/mods/.
- Launch once. Drop your .litematic file into the schematics folder the mod just created.
- M → Load Schematics → pick file → tick Create a placement → Load.
- M → Configuration → Generic → turn on easyPlaceMode.
- Build. Check M → Material List for what you still need.
Installing it without breaking anything
Litematica is a Fabric mod and it will not run on its own. It needs MaLiLib, the shared library behind all of masa’s mods. Two files, both in .minecraft/mods/.
Version matching is stricter than you’d expect. Litematica built for 1.21.1 does not load on 1.21.4. A mismatched MaLiLib is the reason for most startup crashes people blame on the mod itself. Use a separate launcher profile per Minecraft version and keep the mods folders separate too. Mixing them is how you end up with a crash log nobody can read.
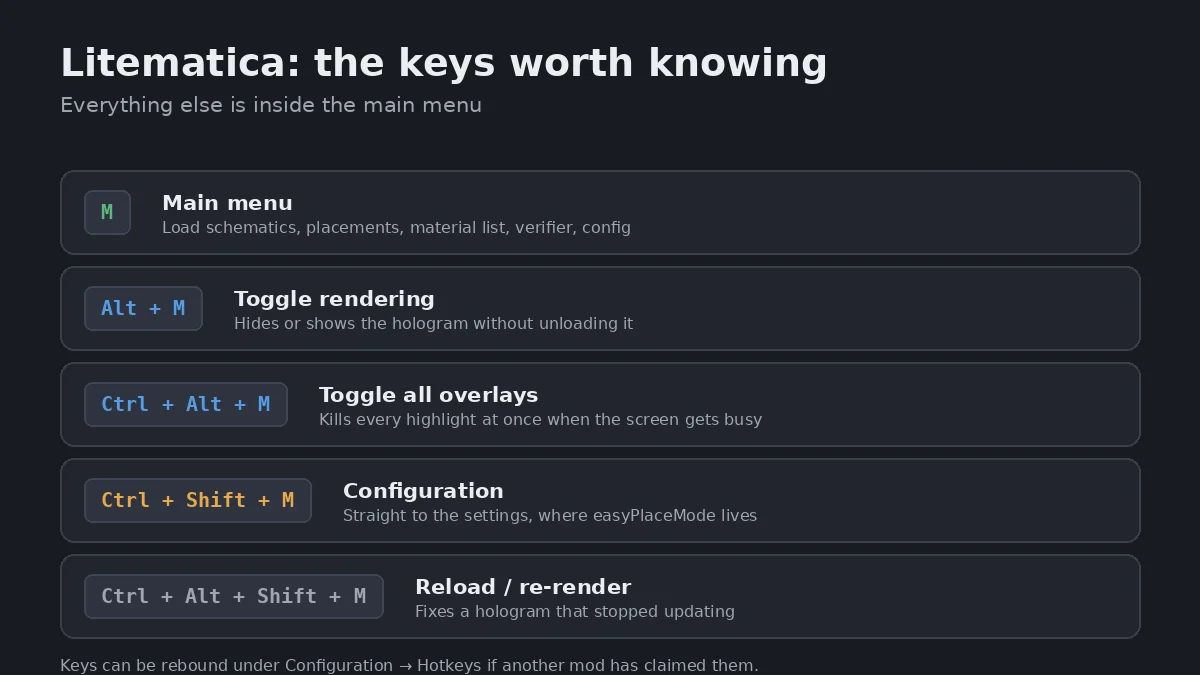
Press M in game. If the menu opens, you’re done with the hard part.
Where the files live, and which files work
The mod reads from .minecraft/schematics/. It creates that folder on first launch, so if it isn’t there, start the game once and look again.
Native format is .litematic. It holds multiple regions in one file plus the material list. Litematica also opens WorldEdit’s .schem and the pre-1.13 .schematic, converting on load.
For builds to actually import, there are free libraries with thousands of files. MCBuild has a large set of litematica schematics by category and, more usefully, filtered by game version. That filter matters. A 1.21 build opened in a 1.19 world comes in with holes wherever a newer block should be, and you find out around the time you start the second floor.
Positioning the hologram
Press M → Load Schematics, pick the file, tick Create a placement, hit Load. The ghost appears where you’re standing, which is almost never where you want it.
Open Schematic Placements and you get real controls. Move placement here snaps it to your position, which is the fastest way to reposition. Rotation does 90, 180 and 270 degrees, for when the front door faces the swamp. Mirror flips the whole thing, handy for a matching pair of buildings. And you can type exact coordinates if you’re lining up against something you’ve already built.
Sort out the vertical position before you place a single block. A build sunk one block into the ground is genuinely awful to fix once the foundation is down.
Two settings to change on day one
Litematica ships with its best feature switched off, which explains a lot of the “this mod is confusing” reviews.
easyPlaceMode (Configuration → Generic). With it on, clicking a ghost block places the correct block in the correct orientation, pulled from your inventory. Without it, you’re swapping hotbar slots constantly and guessing stair directions. It only uses blocks you already carry, and on servers an anti-cheat plugin can block it, because fast precise placement looks like automation. If nothing happens on a server, that’s usually why.
renderTranslucentInnerSides (Visuals). Turn this off. It costs frames on anything large and you won’t miss it.
The material list is the actual killer feature
Press M → Material List. It shows every block the build needs and how many you’re carrying. Sort by what’s missing and you’ve got a shopping list.
This changes the order you do a project in. Instead of building until the dark oak runs out and then going logging, you read the list, farm everything, and build in one sitting. It also catches materials you’d never predict. A castle needing 900 stone bricks is obvious. The 64 light grey glazed terracotta hiding in the floor pattern is not, and that’s a trip to a dye farm you didn’t plan.
Checking your work
Press M → Schematic Verifier → Start / Resume. The mod compares what you’ve built to the file and boxes every mismatch in colour, with counts per category in the menu.
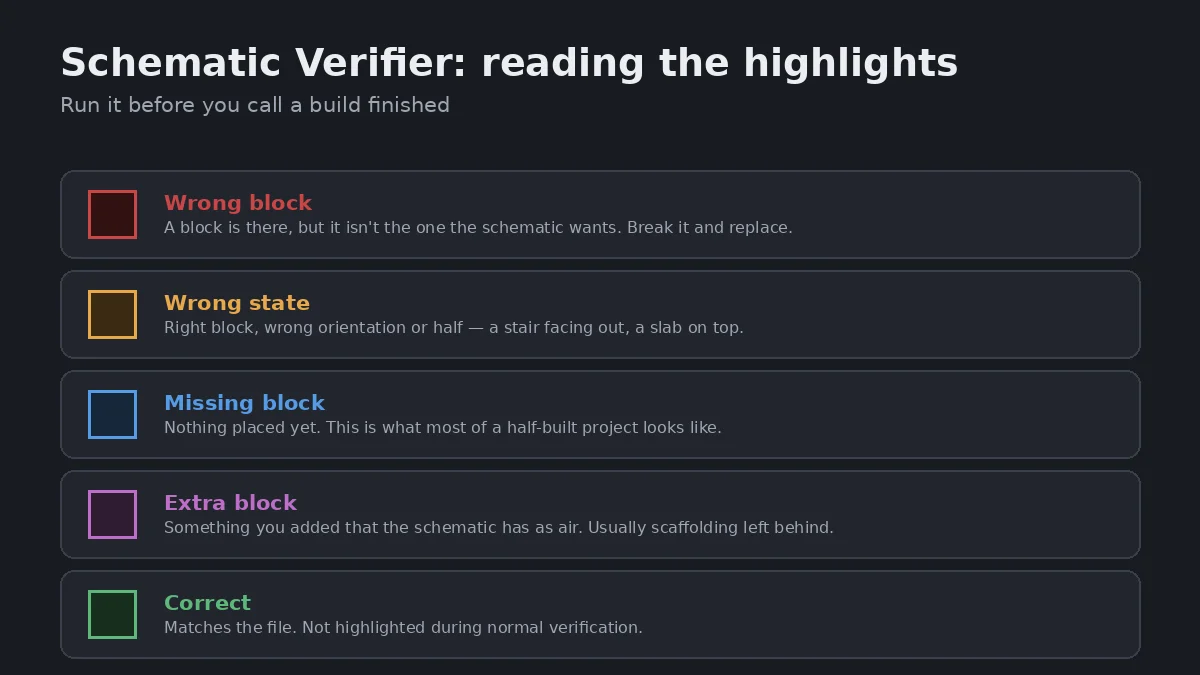
Run it before you call anything finished. Wrong block states are the ones that get you — a stair facing out, a slab on the top half instead of the bottom. Invisible while you’re building, obvious the moment the build is done and you’re looking at it from the hill opposite.
Converting other formats
Got a .schem? Select it in the Schematic Browser and use Import. Going the other way, Convert exports a .litematic as .schem for WorldEdit.
Old pre-1.13 .schematic files need one extra step. They use numeric block IDs from before the Flattening, so run them through a current WorldEdit once — //schem load, then //schem save — before importing. Skip it and you get random stone and air where modern blocks belong.
When it goes wrong
The problems that come up most, and what’s actually behind them:
| What you see | What’s wrong | Fix |
|---|---|---|
| Crash on startup | MaLiLib and Litematica versions don’t match each other, or your game | Check all three against the mod page |
| Mod loads, M does nothing | Another mod claimed the key | Rebind in Configuration → Hotkeys |
| File missing from browser | Wrong folder, or a hidden extension | Show file extensions; it may be castle.litematic.txt |
| Hologram invisible | Rendering toggled off, or render distance shorter than the build | Alt+M, or check enableRendering |
| Purple-black gaps in the ghost | Schematic is from a newer version than your world | Nothing to fix in the mod — get a matching file |
| Easy Place doesn’t place | Setting off, block not in inventory, or server anti-cheat | Check easyPlaceMode, then your inventory, then the server |
| FPS tanks after loading | Big schematic, expensive rendering | Disable renderTranslucentInnerSides, or load sub-regions one at a time |
When to use something else
Litematica assumes you want to place the blocks. If you don’t — a server spawn, a hub, background scenery nobody will inspect — WorldEdit’s //paste does it in one command. On Bedrock or console neither mod exists, so you’re on Structure Blocks, capped at 48 blocks in each direction per save.
For a survival world though, where the building is the point and the only real problem is where each block goes, this is the tool. Grab a file from MCBuild or wherever, load it, and pull up the material list before you start. That’s most of the workflow.