Minecraft: 30 Best Tower Blueprints To Try in 2024

Every Minecraft player knows that having a house is vital for one’s survival and all related storage needs. You need to have something functional, with plenty of space to craft and store all your resources, but your base also needs to be aesthetically pleasing. And what building in Minecraft looks more awesome than a tower?
Towers provide you with plenty of space. They are mysterious-looking and fit in great with just about any vista. This is why we decided to scour the available blueprints online and found the 15 best tower designs that you won’t wanna miss.
Editor’s Note: This list of tower blueprints has been updated in March 2024, to include some new towers that previous versions of this post might have missed!
1. 8×8 Enchanting Tower

Enchanting Tower is great for Minecraft Survival, especially if you’re just starting out, and can easily be built on a Minecraft Earth 8×8 build plate.
A video guide is here. Start with stone bricks on the bottom corners, then use the cobble to build the walls. Then, do some columns in stone bricks on either side of the walls. Stone brick stairs create palisades around the edge and continue building upwards with stone bricks. You then start on the middle section with spruce and finish the gaps with stone bricks. Finish the top with wood, trapdoors, and stone stairs.
2. Survival Tower Base

Using a lot of spruce and oak, this Survival tower is huge and includes many rooms for smelting, storage, crafting, enchanting, bedrooms, farm facilities, and a nether portal.
Start with a torch to mark the center, and make sure you can go at least nine blocks up and out. ItsMarloe explains the rest of the process in this video after setting the base and making the holes for the water source. Lay down all the farmland first. Scaffolding is advised.
Then, you’ll add the top levels using a combination of spruce stairs and spruce slabs and then fill in the gaps with stripped oak, windows, and trapdoors. The top uses some slabs and then oak columns with fences around the edge.
Stone bricks and blocks then get stacked in a way to make the roof structure, filling in with wood. Use oak slabs and stripped spruce to complete the top story.
3. Mage Tower

For this mage tower Use granite and many other block types, this is a great-looking tower straight out of a fantasy movie. The base will be three, five, and seven blocks long based on the initial layout along the diagonal wall as can be seen at the beginning of this guide.
After that, the main walls will be stretched 16 granite blocks high. You’ll need to use temporary blocks during many parts of this build, especially on the corners. Deepslate blocks are used to add structure to the outside, and then add entrances by removing five blocks.
If you want to get creative, you can use amethyst blocks surrounded by stone to give it a magical look. You can create a hole in the middle and put Blackstone and an end crystal to give a beam coming through the middle.
4. Oriental Steampunk Tower

This tower merges some of the most fascinating influences in Minecraft building, the charm of the East, and the mystery of steampunk. To build this tower, you will need 2439 blocks in total with most of them luckily being stone. The tower goes up to 41 levels and has plenty of rooms for storage as well as plenty of spaces just to admire the view. You can furnish it as you like. You can check out the blueprint here.
5. Vintage Victorian Mansion 3

Victorian influences are often seen in Minecraft buildings, the blocky sharp edges compliment the overall aesthetic feel of haunted mansions. This tower is not a behemoth like some of them on this list, but it will prove to be enough in terms of storage spaces and crafting spaces as long as you have some other space nearby. The tower goes up 39 levels and is comprised mostly of spruce wood, which means it’s relatively cheap.
It comes unfurnished and you check out the blueprint here.
6. Steampunk Fantasy Tower House 2

Yet another steampunk tower on this list, but this one is a lot more expensive to make being comprised of 1154 Dark Prismarine blocks. Despite being lean, the tower offers plenty of storage space and seems like a perfect place to set up your enchanter and create those splash potions. Keep in mind however that the blueprint might be difficult to follow due to the elaborate details that the author decided to implement.
7. Unique Wizard Tower
Do you feel like playing as a wizard? Well, then you can’t miss out on the opportunity to live in this architectural marvel. Due to the glass base of the tower, the whole structure looks like it’s floating in the air, and the curved staircase that leads to the Nether Portal only adds to the mystery of the place.
Despite looking really fancy, the tower is not that expensive to make, mostly being comprised of stone bricks, the second most common block being nethrite brick. Even though it looks grand and impressive, if you’re a pat rack you might find it lacking in storage space. You can check out the blueprints here.
8. Crooked Wizard Tower

If you want to roleplay as a woodland hermit, look no further than this Crooked Wizard Tower. Being primarily comprised of spruce wood, this tower i small enough that it’s easy to make fast and functional enough that you will never want to upgrade and move on to something bigger.
The added details like wines and wooden planks only add to the charm. You can check out this blueprint by following this link.
9. Wizard Twin Tower

When it comes to this next blueprint, you actually get two towers, and it mostly resembles some gothic-influenced manor instead of a tower. Still, unlike most of our prior designs, this tower offers plenty of space as well as a killer view via a gallery that connects the two towers.
Twin towers are mostly made out of wood, with the second most common block being cobblestone. It goes out to 50 levels so you know this will be a long-term project and it’s not meant to be your first tower. You can check out the blueprint here.
10. Simple Medieval Tower

Not all players want to live in floating spires, of cyberpunk glass marvels, some people like to jump straight into the living as a wizard and that’s okay. This is why we included this relatively humble Simple Medieval Tower on our list. It’s comprised mostly of wood. It goes up to 18 levels in total and the only decorative blocks used are leaves.
This is a functional tower for someone who likes to live in one but has trouble following elaborate designs. You can access the blueprint via this link.
11. Medieval Detailed Watchtower

Need somewhere to garrison your troops? Look no further than this Watchtower. This stone behemoth goes up 50 levels, is impregnable, and comes with its own portcullis. The flag on top of the tower can be customized as well.
Don’t let aggressive Minecraft mobs bully you into submission, strike back at them with fireworks-loaded crossbows from the top of your very own Watchtower. You can check out the watchtower blueprint by following this link.
12. Warhammer: Reik River Observatory

In this “Warhammer meets Minecraft” tower, we present you with the Reik River Observatory. To construct this tower, location is everything, luckily there are plenty of stable river bends to build on. Reik River Observatory comes with plenty of storage space and elaborate architectural design and once you’re finished building it, the tower will look as if it’s growing out of the rock naturally. You can check out and download the blueprint by following this link.
13. Chinese Skyscraper

Okay, I’ll admit I’m perhaps a bit biased when it comes to towers as I often take only medieval or fantasy towers into consideration, but for all players looking for something more modern (and less troubling to build) here’s the Chinese Skyscraper. It has a sleek black-and-white design, but the problem is the only way for it to not look out of place in Minecraft world is if you create the entire city around it.
You can check out the detailed blueprints here.
14. Airship Docking House

Just in case you have an airship and nowhere to park it, here’s one relatively simple tower that solves all your issues. An additional bonus is that the tower is relatively small and easy to build being comprised mostly of wood and stone. It’s also relatively cramped having virtually one usable room. Still, you’re safe from the creepers and have a killer vista.
Check out the Airship Docking House blueprint on this link.
15. Quirky Medieval Watchtower

This tower is all over the place and you will most certainly have trouble following the blueprint correctly, but it’s cute in its own way and has the “ancient” vibe to it. The Quirky Watchtower goes up to level 26 and is mostly comprised of Stone Blocks and Stone Bricks, with a total block count of 1077.
16. Archmage Tower

Next up is this amazing Archmage Tower. This steampunk-inspired tower comes with its own built-in airship. The whole tower looks very ambitious, comprised of many different elaborately built parts. The majority of needed blocks are wooden and stone blocks. It’s a very unusual-looking tower, but a masterpiece nonetheless, especially for steampunk-oriented wizard characters.
17. Fantasy Wizard Tower

Don’t be surprised by the fact that the majority of towers on this list are going to be Wizard towers. Anyway, let’s move on to our next tower, named “Fantasy Wizard Tower”. This tower is placed on top of an artificially created hill and it looks like it’s naturally growing out of it. You get two towers in one build which are connected conveniently by a single bridge.
There’s even a small cage hanging from the tower on the right. This tower was built by using mostly stone bricks, cobblestone, cracked stone bricks, and mossy stone bricks.
18. Wizard Tower and Airship 2

Airships are apparently a must when it comes to wizard towers. Like our first, tower blueprint, this is a steampunk tower complete with a greenhouse made out of transparent glass blocks.
I mean if you’re roleplaying as a wizard it’s just common sense to have a complete garden filled with “alchemical” ingredients. The majority of blocks needed for this project are oakwood blocks, oakwood planks, cobblestone, and white wool for an aesthetic effect on the makeshift airship. Overall it’s a pretty neat alternative to replace the first tower on this list.
19. BloodElf Tower

This tower might not be as grandiose as our previous towers, but it still appealed to me since it tries to emulate the architecture of Blood Elves from World of Warcraft. It’s like looking at a building that you would normally find in Silvermoon in Quel’Thalas. The tower comes fully furnished and compared to the rest of this list, it doesn’t require as many blocks.
20. Sci-Fi Building

This next tower is inspired mostly by sci-fi. The spikes (or antennas??) on the roof paired with the color scheme give it a sinister vibe. There aren’t any pictures of the interior of the tower, but we can only assume it’s as grandiose as the exterior.
The tower does come unfurnished, which means that you can decorate it with whatever you like. The tower itself is comprised of 18249 blocks, mostly acacia wood, light gray stained clay, dark prismarine, and dark oak wood planks.
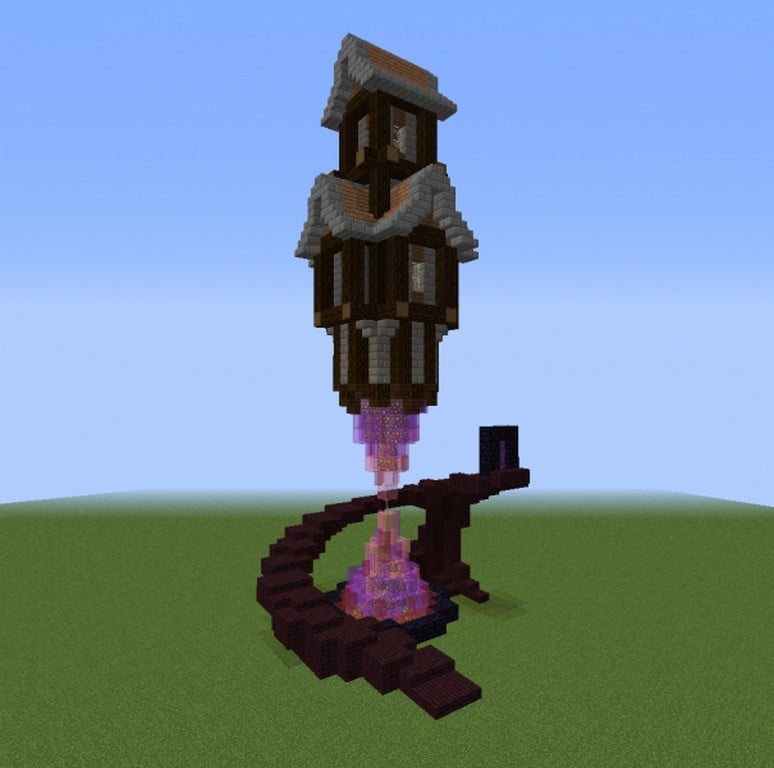
21. Dragon Kingdom Clock Tower

This next tower is nothing short of amazing. Called Dragon Kingdom Clock Tower, this building was designed as a giant clock complete with a pendulum underneath it. While it doesn’t look like your classic wizard’s den, it’s definitely something fantasy-inspired.
To complete the look of a fancy clock tower, the author decided to add gardens and pools with a miniature waterfall as well. The main building is mostly built using andesite blocks and spruce wood planks.
22. Tall Medieval Tower

Up next on our list of best Minecraft towers, we have a classic medieval tower. The design is less complicated than most of the towers on this list, but what appealed to me the most were the leaves and vines wrapping around the tower itself. Complete with that, the building looks like some long-forgotten crumbling tower straight out of a fairy tale. It comes with a huge flag as well.
You can probably modify the color if you want. The Interior of the tower is furnished and to build it, you’re going to need mostly stone bricks and cobblestone. There is a lot of climbing involved while you’re moving around, but the author promises that it’s very “roomy” inside. That means there’s plenty enough space for chests.
23. Small Wizard Tower 2

As the name says, this tower is not as grandiose as the rest of the towers on this list but it has a certain charm. I could totally see myself building this since it doesn’t require as much effort and material and you end up with a beautiful result. This small tower is medieval-inspired, and it comes with a small charming balcony and ivy-covered walls. From the images provided, it’s clear that you have enough space for storage. Since it comes unfurnished you can decorate it however you want. To build this tower you’re going to need primarily oak wood and stone bricks.
24. Floating Wizard Tower 3
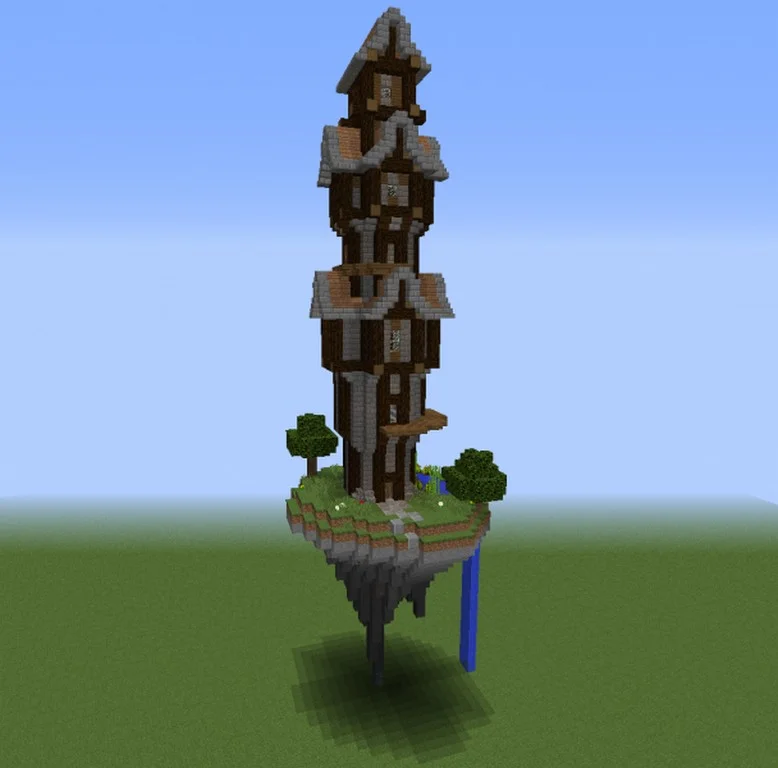
The floating effect of this tower is not an illusion, it truly is placed on an artificially made floating island. Complete with a small waterfall as well. It looks really call, it has a small garden, and it looks like it has enough space for all your storage-related needs. All in all, it’s a beautiful tower to build, even without the floating island.
The interior comes decorated with bookcases mostly, you’re free to add anything else you’d like. The materials to build it are not difficult to acquire as well. You’re going to need stone and stone bricks mostly, with various wooden blocks sprinkled in.
25. Ragnar’s Medieval Watchtower 4

Up next we have a real castle. Complete with sharp rooftops and stone entryway. The only detail that missing, and I strongly encourage you to add it, is portcullis made out of simple iron bars. While most of the images provided are that of the exterior, the tower doesn’t look small and it looks like it’s roomy inside. There is a set of stairs on the outside that gives you access to all the great vantage points this building provides.
It’s mostly made out of stone bricks, light gray stained clay, diorite, and regular bricks. The furnishing status is unclear, but whatever is it inside it probably matches the exterior.
26. Eiffel Tower, Paris

Players have been trying to recreate famous real-world landmarks in Minecraft for ages. Some replicas look amazing, some not so much. Luckily for us, the author of this blueprint managed to build a pretty decent Eiffel Tower, and of course, provide us with the blueprint. Unlike the original, this Eiffel Tower is mostly made out of spruce wood planks and stone slabs.
27. Clocktower

We’ve had one clocktower already, but since they are such an interesting concept why not add another one? This clocktower has multiple clocks as decorations, it also has a really unique design.
The level of detail is amazing, and it’s not surprising considering the fact that it’s built out of 14126 blocks. While the majority of the tower was built with iron blocks, stone bricks, spruce wood planks, and dirt, darker details were made with black wool. The furnishing status of this building is unknown, as well as how much space it provides for storage.
That’s what gives it that brown color. Unlike most towers on this list, this one cannot be used as a shelter, since it provides very little space. Instead, you can incorporate this into your already existing city or town, and mostly just use it for sightseeing.
28. Medieval Lighthouse Detailed

A humble tower, for someone who doesn’t want to spend much time building and gathering resources, but still wants to end up with something usable and pretty. This lighthouse comes equipped with living quarters and a tower that lights up during the night beautifully. Ideally, this lighthouse would look even better if it was placed near the sea with a few shipwrecks peeking out of the water for added effect.
The lighthouse was built with 1821 blocks, which is a relatively small number when you consider some other entries on this list. Most of the lighthouse was built using various wood blocks like oak wood, oak wood planks, oak wood stairs, and wooden slabs. You’re going to need many torches as well to recreate the glow during the night.
29. Floating Wizard Tower 2

One more floating wizard tower on an artificially made cliff. This tower has a dark and brooding gothic look complete with a sharp rooftop. The balance of the overall dark theme is equalized with the usage of light-colored wood blocks and stone bricks. The tower looks roomy enough but comes unfurnished. You have absolute freedom on how to decorate it both inside and outside.
30. Medieval Brick Tower

This Tower might not look the most elegant but it certainly looks the most useful. It looks like it has plenty of space inside to fulfill all your needs. Some floors can be reached via a curved staircase, and some by ladders. Seems like a smart material-saving decision, one curved staircase is time-consuming to build as it is. Even though it looks massive, this brick tower is made out of 1649 blocks. Mostly brick, oak wood, stairs, and cobblestone.
Have a tower to add to the list? Let us know in the comments below!