The Sims 3: Here’s How To Move to a New Town

Choosing the perfect town to live in is an important aspect of every Sims game, and The Sims 3 is no different. When creating our new Sims household, we have plenty of options when it comes to our place of living, but, just like in real life, we might feel like it’s time to change the scenery a bit, or perhaps we’ve finally scored that promotion and now have enough funds to move to a new fancier town. No matter how you put it, chances are you’ve probably wanted to move your household or individual Sim at least once. But is it possible? Can you move to a new town in Sims 3, and if you can, how?
How many towns are there in Sims 3?
Towns are called neighborhoods in Sims 3, and besides them, smaller areas of the world exist in which it’s not possible to live. Those are called sub-neighborhoods. The Sims 3 has 19 towns (neighborhoods) in total and five sub-neighborhoods. Some of the neighborhoods were added with the base game or expansions, but most are available as separate purchases. Sub-neighborhoods were mostly added by large expansion packs.
The following is a full list of all available towns (neighborhoods) in the Sims 3:
- Sunset Valley – added with the base game.
- Riverview – added for free after registering the game.
- Twinbrook – sprawling city added by The Sims 3: Ambitions.
- Bridgeport – partygoer’s paradise. Added with The Sims 3: Late Night expansion.
- Appaloosa Plains – small town surrounded by verdant farms and nature added with The Sims 3: Pets expansion.
- Starlight Shore – for future celebrity sims, added by The Sims 3: Showtime expansion.
- Moonlight Falls – scary but mystical place added by The Sims 3: Supernatural.
- Isla Paradiso – tropical getaway added by The Sims 3: Island Paradise.
- Barnacle Bay – a pirate-themed neighborhood that can be purchased from the Sims store.
- Hidden Springs – mountainous neighborhood available at the store.
- Sunlit Tides – comes in two versions: gold and standard. This is a habitable group of islands that can be purchased from the store.
- Lunar Lakes – for players who wish to live on an alien planet. The neighborhood is found at the sims store.
- Lucky Palms – comes in gold and standard version, a dessert getaway for sims that love the heat. Purchasable from the store.
- Monte Vista – Italian-themed neighborhood purchasable from the store.
- Aurora Skies – Icelandic-themes neighborhood that can be purchased from the store. Comes in standard and gold versions.
- Dragon Valley – a medieval-themed world that comes in standard and gold versions. Purchasable from the store.
- Midnight Hollow – a gothic-themed world that likewise comes in two versions, standard, and gold. You can get it from the store.
- Roaring Heights – 1920s and 1940s-themed neighborhood, comes in two versions and can be purchased from the store.
- Adventureland – a version of Sunset Valley that was previously used for testing clean worlds, added by patch 69.

We’ve mentioned that Sims 3 has five sub-neighborhoods as well, so it would be only fair to mention them as well. The following is a list of all five sub-neighborhoods in Sims 3.
- Champs Les Sims – added with The Sims 3: World Adventures as a vacation destination, french-themed.
- Shang Simla – added with the World Adventures as well, Asian-themed.
- Al Simhara – the last vacation spot in the World Adventures, Egyptian-themed.
- Sims University – a university that sims can attend. Added with The Sims 3: University Life expansion.
- Oasis Landing – a futuristic neighborhood added with The Sims 3: Into the Future expansion.

Can you move into another town in Sims 3?
It’s possible to move both within the new town and to a completely different town in Sims 3, given that you have the appropriate funds to buy a house or an empty plot of land. It’s possible to move your house, your household, or an individual sim to a brand new location. However, the latter options are only available through the “edit town” mode.
Moving your Sim to another town via phone or computer
This is the most straightforward and least complicated way to move your Sim or Sims to another town. By moving this way, you can decide whether to sell the house and furnishing or keep the furnishings. You can later retrieve the furniture from your “build mode” inventory. To move your sims to another town by using a phone or computer, follow these steps:
- Navigate to your computer or open your smartphone that can be found in your inventory.
- Choose the “Realestate and Travel services” option.
- Choose the “Move” option.
- Now a prompt should appear that offers you two options, to move within the same neighborhood or to move to a different town.
- Another prompt should appear via which you can choose your new neighborhood and choose whether you want to sell your furniture or keep it.
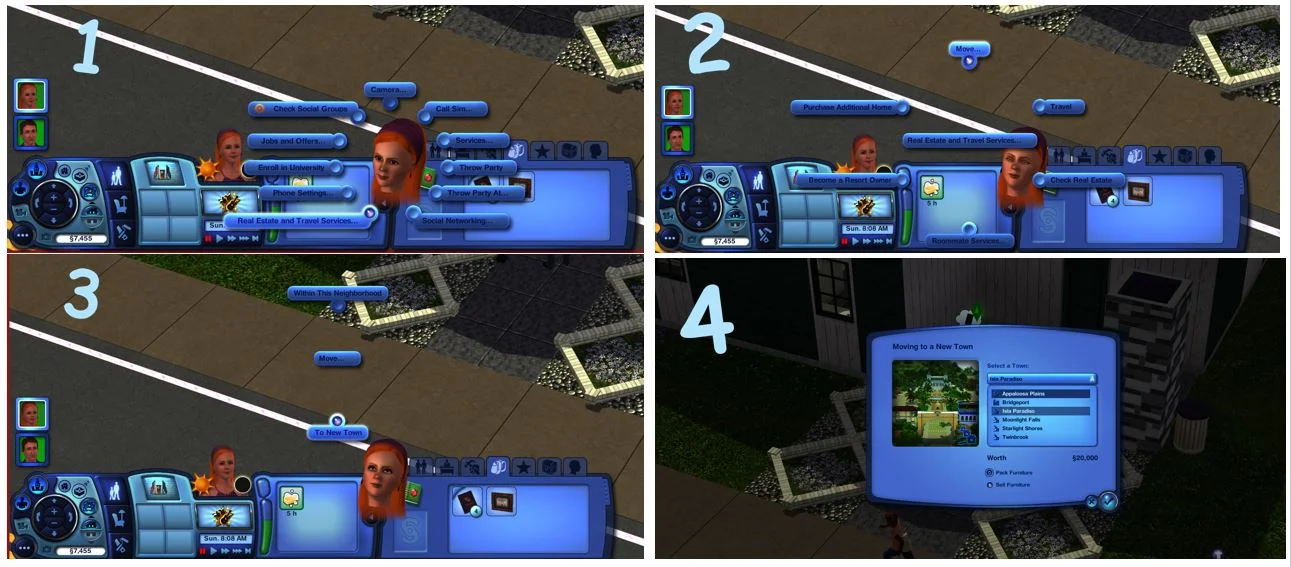
And that’s it. As you can see, moving to a different town is extremely easy and requires just a few clicks.
Moving to a new town in Sims 3 via “edit town” mode
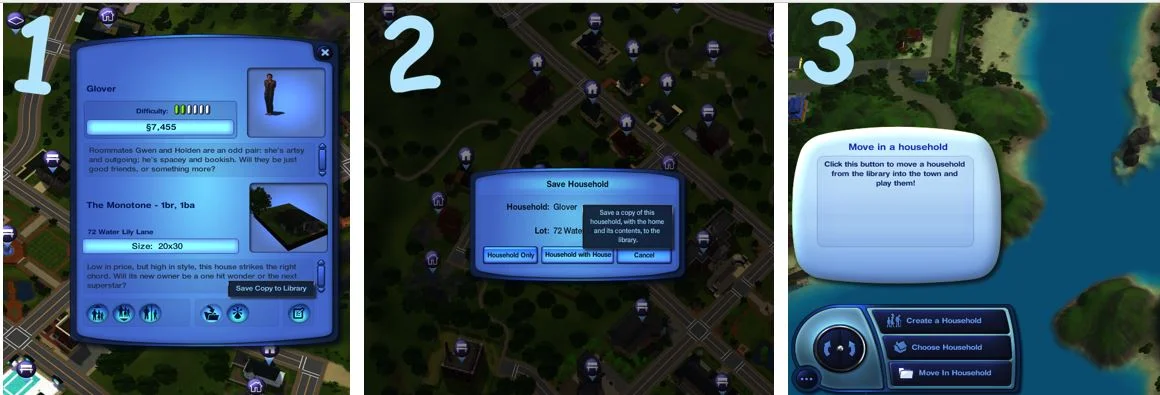
The next approach to moving requires a bit more steps, and it’s a bit more complicated than when you’re trying to move with the phone. It requires you to save your household and then transfer it over to a new or existing game. To do this, follow these steps:
- Load your existing save. Once the game has loaded, head into the “Edit Town” mode.
- Click on your current household, and household options should appear, choose to save your household to a library.
- Once there, you will be presented with several options as well as with an option to save your household with a house or without a house. Choose what suits you best.
- Save your changes and return to the game. After that, head to the main menu of the game.
- Click on the “Create New Game” option and choose a new town.
- Once the town has loaded, select the “Move in household” option.
- Select your saved household from the library and purchase the appropriate plot or house.
And that’s it! The only downside to this approach is the fact that you need to start a new game. But moving to a different place is always a clean start, so it’s not immersion-breaking at all.
Have something to add? Let us know in the comments below!